Tuesday, June 26, 2012

Olioboard Heaven

Have you used Olioboards yet?  Well what are you waiting for!  If you are a Interior Decorator, Redesigner, Home Stager or just someone who loves decorating their home or their friends and family's spaces then http://www.olioboards.com/  is the place for you! 

What are Olioboards you ask? Great question...

Olioboards are mood boards that you can create on their website for free.  Yep you heard it right, for free!  It is perfect for Designers who put proposals together for clients or anyone who loves interior decorating. Once you create an account you then create a profile for yourself or your company.  They also have community boards where you can see what others are creating and you can follow your favorites. 

Click create Olioboard and that is when the fun begins! The boards are created by dragging and dropping your selections on to your Olioboard. You can upload your own photos of furniture, rugs and accessories if you want or choose from the large library of items they have available. The accessories, lighting, furniture, rugs and much more also have links to the store where the item is sold.  I usually begin with what space I'm working with for example let's say a dining room, I find my 3D set for my background and start finding my furniture and accessories.  Here is an example of a dining room Olioboard I did..

                               Fun and Eclectic Dining

Here are a few more I've done for clients, fun or Olioboard contests they run.

                                 Wayfair Relaxed Living

                                Natalie's livingroom #2

This one was for a contest for a nursery, isn't it cute!  It almost makes me wish I had a baby again...

                                   Sugar and Spice

                                    Living Room Ideas

So if you haven't tried Olioboards yet give it a try and have fun decorating!


Wednesday, May 9, 2012

Ideas For My Living Room

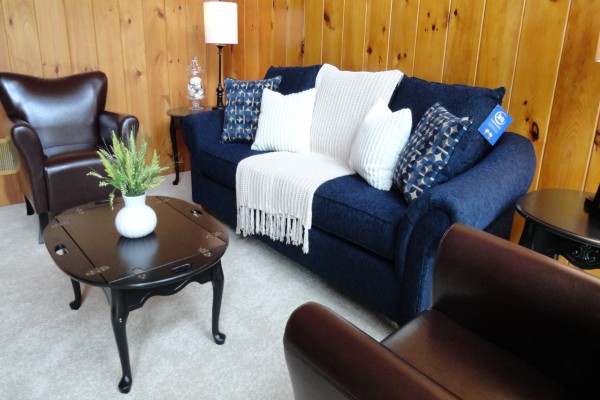
So, I just finished a vacant staging for a beautiful home in Bedford, NH.  I'm very happy with the results of the staging, here are how a few of the rooms turned out.


 I used three of my tables that were in my living room for the vacant home's family room. I painted them black with the intention of giving my living room a redesign.  So now my wheels are turning to get some inspiration for my living room.


Here are some inspiration ideas from images from BHG, http://bit.ly/K5tE1B, and an Olioboard I created with some items from West Elm.


I really love the use of geometric patterns in rugs, pillows and curtains. I think using traditional timeless lines in your furniture and adding color with your accessories, throw pillows, rug and curtains.  So if you need a change, this gives you an affordable way to update your room without spending money you don't have.


I hope my next post will be my completed redesigned living room...


Friday, March 9, 2012

My New Tufted Headboard

I can't begin to tell you how long I've wanted a tufted fabric headboard.  My day has come!  My husband surprised me for Christmas with a king mattress.  Since, we had a queen that meant we needed a new headboard.   We practiced making a fabric headboard for my daughter Amanda's room first.  See how nice that turned out!


Now it was time to attempt to make our tufted one.  Making a tufted headboard is a team effort, thanks honey!


There is measuring, drilling and figuring out where you want your buttons to go and how many.  To help us with that decision I found some inspiration headboards for examples to go by.


 We cut the MDF to size, drilled the holes where the buttons will go, attached the 2" foam and cut slots in it with a diamond pattern, stapled on the doubled-up batting and poked holes through the whole thing.  


Once the hard part was done we moved on to covering our buttons. Not hard once we got the hang of it.We needed 34 buttons for our tufted headboard.


  So we were ready to begin.  We had our MDF board, 2" foam, batting doubled, fabric and buttons, let the tufting commence! We started in the middle and worked our way out. We threaded the buttons and stapled them on the back.  Seeing the headboard come together really motivated us to keep going to see the finished product.


I'm very happy with the way it turned out!  Now, I want to redo the room and paint the walls.  Oh, but that's another blog.


Friday, February 17, 2012

To Paint or Not To Paint

In redesign or staging the decision to paint paneled walls is easy!  In my opinion, it gives a room an instant update.  We all know buyers look online first before viewing a property.  A great way to appeal to buyers is giving them updated spaces to see.   Paint can do wonders!  It can lighten a dark room, give a space a cleaner feel and most of all can bring an 80's room up to 2012! 


The ultimate goal is to get buyers to your listings through great pictures.  Working with a Home Stager can do just that!  They will advise and work with your client to help the product show better in photos and for showings.


Here is a redesign of painted paneling, see what a difference it made in this room!


Don't you feel like painting some paneling now??  


Thursday, February 16, 2012

I'm In Love With Fabric Headboards!

Something I've always wanted to do was make a fabric headboard!   They give a space sophistication and romance.  There are so many styles to choose from, really limitless.


Here are some of my inspiration pictures from Better Homes and Garden:


 And best of all you don't have to know how to sew,great for me since I don't.  ( of course that is another thing I'd love to learn how to do)

I plan on making two headboards for my house, one for my new king bed and one for my youngest daughter's room.  I thought it would be a good idea to practice with my daughter's first.  A big THANK YOU to my husband for helping with all the woodworking tasks!


  • First thing we did was measure her mattress, hers is a queen.  Some instructions say add inches beyond the mattress and we tried that, it didn't look good.  So do whatever you think looks best for YOU.
  • Got MDF board and cut according to the measurements.
  • Bought 2" foam
  • Bought batting to wrap over the foam.
  • Bought a good staple gun. 
  • Spray adhesive, which really didn't help the foam stick to the MDF board.
  • Fabric, allowing an extra 6 inches around to staple on the back of the MDF board.
Here is what the steps looked like:


Our headboards are going to be mounted to the wall.

Here is the finished product for my daughter's room.  First you should know that she is 19 years old and has always loved animal prints.  I think she would love the whole room in them. I thought it would be a nice jumping off point to start with the headboard.  Another thing I need to mention is this is only the beginning for her redesign.  We are picking a new comforter, art and new pillows.  Stay tuned for future blogs for this room...


On the king headboard I'm going to attempt tufting, I'll let you know how that goes in another blog.  Wish me luck!


Friday, January 6, 2012

Tips and Tricks For A Closet to Be Proud Of


Whether you're selling your house or not it is time to pay attention to your closets! In my opinion it is kitchens, bathrooms and closet space which helps sell homes. 


If you do not have great closets or linen closets you need to make it look like you do. If you are one of the lucky ones to have big closets and large linen closets, it is time to show them off!

Let us begin with linen closets. Take everything out and look at the items. Purge out what you have not used in years. Do not forget those really thin towels with all the strings; they can be thrown out now. If you are trying to sell your home I suggest packing away 50% of the items. 


Can we talk about folding? Folding is vital to making the linen closet look organized. The sheets should all be folded the same way, with the nice rounded side facing out.  Fold the towels in thirds and place the nicer edge facing out also. Towels should be with towels and sheets should be with sheets.  Things you don't use often should be higher such as quilts, blankets or extra pillows.  Take a close look at the pictures for some great folding examples I found.


Adding baskets to hold items can add texture and help hide things that you do not want to be seen.
When organizing you clothes closets put like items together.  Add built in shelves in the closet to help keep it organized.  Many of the organizers allow you to design it the way you want it to be depending on the size of the closet.


 This is a closet of a homeowner I quickly helped organize for a home staging.  It took about 10 minutes to pull out extra hangers and organize the clothing a bit.  Ideally I would have loved to have nice wooden hangers, but that wasn't an option


Just weeding out the clothing and arranging the items helped this closet put it's best foot forward.

Happy Organizing in 2012!!

Friday, October 7, 2011

Oh How I Hate to Close My Porch

Well it's that time of year again, Fall.  The time of year when New England is covered with a blanket of colors. Really my favorite time of year except that we need to close the porch for the winter.  The porch is the place where we spend most of our time during the Spring and Summer.


When we first decorated the porch I was into country and birdhouses.  I had very heavy roman shade blinds that a friend made and beige walls.  Now it has gone through a transformation to what it looks like today.  I wanted a tropical feel but without bright flowers and pink plastic flamingos.


We added white faux wood blinds, just as good looking at the expensive brands.
I wanted to be able to open them to see the backyard and shut them when needed. To save some money on the larger windows I used two blinds side by side on the same window, but they look like one large one.


 I love our ceiling, it's tongue and groove pine with a clear poly finish. It really makes the room feel warm and tropical. We pained the walls a bright sunny yellow, added some cushions that are red with green palm leaves on them; tropical remember. A large palm wall art was added and a copper vine accent above two of the windows. Seating is very important, we added a small round wood topped table with iron legs. Great for summer dinners!


So as the cold weather approaches and while my porch hibernates for the winter, we will remember the good times on the porch and look forward to when spring will come again...

If your porch needs color coordination, window treatments, a wood ceiling, furniture placement or accessories contact me at lisa@arrangedtosell.com for some ideas.