Thursday, January 17, 2013

Oops Don't Open That!


When getting your home ready for the Real Estate market, organization is an important ingredient. 

When I walk through a home with a client I ask them if they mind if I take a look in their cabinets and closets. 

As a Home Stager (http://arrangedtosell.com/staging.html) it is my job to look at the home with objective eyes.  I think of myself as a buyer and what would be important to me when looking for a house to buy.

As a buyer I’m making a “To Do” list as I tour the property. What needs to be fixed, painted, replaced or sometimes even gutted.  Only 10% of home buyer's can see what potential a home has. 

Organization is a main key element to please a buyer. Why do closets, pantries or cabinets need to be organized?  When a buyer enters a home it usually is in a foyer and the first thing they would do would check out the coat closet.  What is the first impression when looking in that closet?  Is it stuffed with coats, wrapping paper, bags, snow pants, gloves, tennis rackets and many other items? The impression given is that it appears this house does not have much storage space.
  • Tips for organizing all closets; remove 50% of the items. This gives it a feeling of spaciousness. Purge the items you don’t use or pack them away. Add decorative baskets for the top shelf to hide away any clutter.

So the buyer moves down the hall to see the desirable area that is the kitchen.  A buyer wants to see if they can see themselves cooking in this kitchen and of course they open the cabinets. Do things fall out at the buyer when they open up the cabinets? Are the counters lined with cooking gadgets?
  •  Some tips for organizing kitchens are to purge items! Think of it this way, your intention is to move so let the packing begin now. 
  •  A pantry is a great feature in a home. Play it up by making it look nice and neat!  Organize like items together and purge outdated ones, use canisters and baskets to hide the little things. If the pantry has an upper shelf that is usually a great place for a mixer or other large items you do not use often.  
  • If you have cabinets with glass doors it is great to display nice plates, glasses or bowls in it.  
When a buyer enters a bathroom what is the first thing most look for?   Besides the whirlpool tub they look for storage as in a linen closet. When they take a peek in is it stuffed with towels, sheets, heating pads, dirty laundry among other things? 

  • Tips for the bathroom; make sure the linen closet is not stuffed with items.  Remove 50% to insure that it looks spacious.
  •  Fold the towels neatly with the nice side facing out. Freshen up the closet and space with fresh new towels. 
  •   Baskets are great for wash cloths and to hide little items.
  •   Fold the sheets neatly with the folds facing out.

  •  Go through the cabinets and purge. Using baskets under the sink helps to keep items organized and looking neat. 
Here is an example of what an organized linen closet looks like from www.houzz.com.


Also throwing in a picture of my dream closet hmmmm.


Remember when you are selling your home view it as a product you are selling.  How are you packaging the product? If you were shopping would you buy something that was not packaged well?? Think about it…

Have fun and keep staging!

Tuesday, January 8, 2013

Projects Around My House


We all have them; the things we need to get done around the house, things we would like to see get done and the things that absolutely need to be done!

Here are a few projects we have been working on around our house:

Our biggest project we started is doing some DIY renovations around the house.  We want to sell our home in the future so we decided update areas in our home to make it more marketable.

Our inspiration http://www.cyberrentals.com/USA/Massachusetts/r1111.htm was a beach house we rented in Plymouth Mass last summer. We just fell in love with all the moldings this home has and it got our wheels turning with ideas.  We knew that once we started we needed to finish the job, especially where we are replacing all the moldings throughout the home with taller ones. 

 We started with our ½ bath where we enlarged the moldings, added crown molding, replaced the sink and faucet, http://www.homedepot.com/ added a new mirror, lights, painted the walls and painted the existing cabinets.  Now this room feels updated and I love the look crown molding brings to the space. 


                                                Before


                                                After


It does help that my husband is handy and has a workshop. I know if we had to hire someone and pay for the labor we would not have done as much as we have.  


The next room we tackled was the kitchen.  BIG job!  In our inspiration kitchen we loved the lighter cabinets, dark granite and stainless appliances.  We also liked that the cabinets went all the way to the ceiling and had lighted doors as accents.                                           

                                        Our Inspiration Kitchen


Before


My handy husband came up with ideas to make our dream a reality.  We painted all the cabinets and spray painted the doors.  He built boxes to add to the top of the cabinets and added new crown molding.  We saved money by painting the existing cabinets and created the look we wanted by extending them up to the ceiling.  I love the results!

                                                         After


We decided to paint the island a contrasting color of chocolate brown, added moldings around it to give it a beefier look which coordinates with the taller moldings.   We are still in search of the perfect counter stools.  Where we have gone with neutral colors and white cabinets I want to bring some color to the space with the stools and accessories.  


The next room we worked on was our dining room.  We had wallpapered above the chair rail 13 years ago and I was pleasantly surprised how easy it came off.  


In the dining room we added wainscoting to the walls and taller moldings.  We are trying to be consistent with our wall color http://www.sherwin-williams.com/ so again it is SW-Irish Cream. 

                                                    Before


                                                                              After


We next moved to the living room. This space is still in the process of it's transformation.  My husband Eric is installing hardwood flooring, sanding and finishing it himself.  I’ll let you know if that was a nightmare or not.  He will also be adding the taller moldings, wainscoting, crown molding and a fresh coat of SW-Irish Cream.  I can’t wait until it is finished!! 


                                                 Before


                                                                           During


The tape is to keep a cute little dog named Max out of the room.  

So this is where our DIY projects stand for now.  I will update with some after photos when this project is complete!

GO HUBBY!!!


Friday, January 4, 2013

Some Important Home Staging Tips


Home Staging Tips

Thinking of selling your home?  Here are a few of my tips to help get your home market ready.  http://arrangedtosell.com/staging.html

·  Hire a Home Stager to go through your home with objective eyes.

*This happens to all of us!  We get used to how our surroundings look after living in a home for years.  Working with a Home Stager brings a fresh outlook when getting your property ready to be listed. 

· Take notes of what is recommended.

*Taking notes is so important when going through your home with a Home Stager.  I usually hand my clients a pen and a clipboard with a worksheet. 


·  Don’t take the advice personal!

*When walking through your home a Stager’s job is to help market your home to sell faster.  So don’t take any recommendations too personal.  As a Home Stager I’m not judging my clients decorating style.  As I walk through the home I’m thinking about good flow, furniture placement, does the space feel too small or cluttered, is there enough closet space and cabinet space.  Could a buyer see themselves living here?


·   Look at your home as a product you are selling.

*This is one of the most important things to remember!  By looking at the house as a product it helps detach you from the property.


·  Have fun with the staging process!

*Selling your home can be stressful for everyone.  Packing up your life after living in your home 10 or 20 years can often be filled with memories of children growing up, gatherings with friends and family, and years of accumulated items.  Working with a Home Stager can help you keep focused by giving you recommendations of what needs to be done first.  My clients know that I want them to enjoy their staging experience, in the process of getting their product market ready. 

The ultimate goal when you list your home with a Realtor is to sell it.  No one wants to see their property on the market for months having to keep reducing the price.  When you invest in the beginning of the selling process by working with a Home Stager you can be confident you're getting the best bang for your buck!  


Monday, November 19, 2012

Dream Kitchen Transformation

Our Kitchen Transformation on A Budget

We all have our "Honey can you..." lists for our homes and a collection of inspiration pictures for changes we would like to make.  One of my dreams has been for a long time is to update my kitchen and paint, yes paint, our kitchen cabinets. 


Here is what my kitchen looked like before...


My kitchen was dark most of the day, because the kitchen only get's sun in the morning. We had updated the counters to granite and added stainless appliances a few years ago. The kitchen still seemed dark and a little dated. It took many months to convince my woodworker husband to paint the cabinets.


Much of my inspiration came from http://www.houzz.com/photos/traditional/kitchen.  If you have not checked out their site yet I highly recommend it!


Below are the results of our transformation on a budget!


Here is what we did:

  • My husband added on to existing cabinets to fill in the gap between the tops and the ceiling.
  • Added frosted glass door with lights behind them for a nice accent (plexiglass substitute $7.00 for a full sheet).
  • Added crown molding throughout the room and replaced all moldings to be taller.
  • Painted the cabinets and moldings the same Sherwin Williams Bright White.
  • Painted the walls Sherwin William Irish Cream.
  • Painted the island a chocolate brown.
  • Update lighting in the kitchen and added a drum shade over the table.(image not shown)
We are so happy with the results!  

I hope this gives you some inspiration to change one of your spaces today!

                                 
http://www.shabbynest.blogspot.com/

Friday, August 31, 2012

To Stage or Not To Stage

Vacant homes....let us think about those words for a moment.  The word vacant means empty, void, blank.  If you are a buyer looking on line for homes you want to go see, is a vacant home something that may appeal to you? NO, the home that will appeal to you is something that has style, it grabs your attention through its features and details it has and how it is presented to you.

Staging a vacant home can not only grab the buyers attention, but will sell the home faster. 

Here are a few before and after photos of a recent vacant staging we did in Hampton, NH.
http://aarealestatepartners.com/


As you can see by adding furniture and some accessories to a vacant home it helps to add style and warmth to the space.  This helps the buyer to visualize living in the home, helps them fall in love with different features that by staging has brought to their attention. 

This is a wonderful cape style home for sale in Hampton, NH about 3 miles from Hampton Beach.  It has an open floor plan with a spacious kitchen that has a corner gas fireplace for cozy family dinners.


Tuesday, June 26, 2012

Olioboard Heaven

Have you used Olioboards yet?  Well what are you waiting for!  If you are a Interior Decorator, Redesigner, Home Stager or just someone who loves decorating their home or their friends and family's spaces then http://www.olioboards.com/  is the place for you! 

What are Olioboards you ask? Great question...

Olioboards are mood boards that you can create on their website for free.  Yep you heard it right, for free!  It is perfect for Designers who put proposals together for clients or anyone who loves interior decorating. Once you create an account you then create a profile for yourself or your company.  They also have community boards where you can see what others are creating and you can follow your favorites. 

Click create Olioboard and that is when the fun begins! The boards are created by dragging and dropping your selections on to your Olioboard. You can upload your own photos of furniture, rugs and accessories if you want or choose from the large library of items they have available. The accessories, lighting, furniture, rugs and much more also have links to the store where the item is sold.  I usually begin with what space I'm working with for example let's say a dining room, I find my 3D set for my background and start finding my furniture and accessories.  Here is an example of a dining room Olioboard I did..

                               Fun and Eclectic Dining

Here are a few more I've done for clients, fun or Olioboard contests they run.

                                 Wayfair Relaxed Living

                                Natalie's livingroom #2

This one was for a contest for a nursery, isn't it cute!  It almost makes me wish I had a baby again...

                                   Sugar and Spice

                                    Living Room Ideas

So if you haven't tried Olioboards yet give it a try and have fun decorating!


Wednesday, May 9, 2012

Ideas For My Living Room

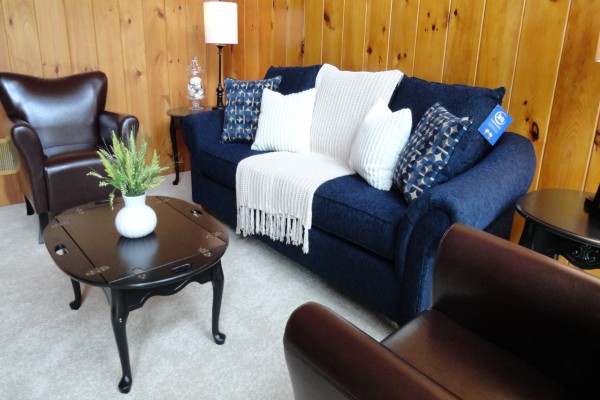
So, I just finished a vacant staging for a beautiful home in Bedford, NH.  I'm very happy with the results of the staging, here are how a few of the rooms turned out.


 I used three of my tables that were in my living room for the vacant home's family room. I painted them black with the intention of giving my living room a redesign.  So now my wheels are turning to get some inspiration for my living room.


Here are some inspiration ideas from images from BHG, http://bit.ly/K5tE1B, and an Olioboard I created with some items from West Elm.


I really love the use of geometric patterns in rugs, pillows and curtains. I think using traditional timeless lines in your furniture and adding color with your accessories, throw pillows, rug and curtains.  So if you need a change, this gives you an affordable way to update your room without spending money you don't have.


I hope my next post will be my completed redesigned living room...